
Extending Burp Suite for fun and profit – The Montoya way – Part 10
- Setting up the environment + Hello World
- Inspecting and tampering HTTP requests and responses
- Inspecting and tampering WebSocket messages
- Creating new tabs for processing HTTP requests and responses
- Adding new functionalities to the context menu (accessible by right-clicking)
- Adding new checks to Burp Suite Active and Passive Scanner
- Using the Collaborator in Burp Suite plugins
- BChecks – A quick way to extend Burp Suite Active and Passive Scanner
- Custom scan checks – An improved quick way to extend Burp Suite Active and Passive Scanner
- Burp AI
- … and much more!
Hi there!
To kick off my collaboration with PortSwigger as a Burp Suite Ambassador and the Extensibility Month on PortSwigger Discord, what better topic than AI, features recently introduced by PortSwigger to further expand the capabilities of the suite. On this topic, I’m sure we’ll see many new features in the future, but we already have APIs available that we can use to create powerful extensions!
For a couple of years now at HN Security we’ve been dedicating part of our R&D time to the AI space, which has mainly led to the development of an internal AI red teaming methodology, but also to evaluating possible integrations of these technologies into our company’s documentation tools and testing tools. At the moment, these integrations are still limited, both for compliance reasons and due to the agreements we have with our clients, but we are likely in a transition phase that could lead, in the near future, to a more pervasive use of these technologies, which could further improve the quality of our team’s work.
This article will focus on the use of the AI features currently offered by PortSwigger within extensions, without going for the moment into detail about their use within the Burp GUI, as that would be out of scope for this series of articles.
To approach this topic, we are going to develop an extension that will simplify reporting of a issue, named AI Reporter. The idea is the following one: when we find an issue during our manual analyses, we want to use AI to analyze the request and response, extract the relevant information, and add a specific issue to Burp. For example, we’re in Repeater, we discover a SQL injection, and from the context menu we select ‘Report with AI’, telling to the model that the current request proves a SQL injection. The tool will then take care of creating a specific issue for us with the details of the identified problem, including generic SQL Injection information and details on the particular issue extracted from request/response.
Usually, I always publish a PoC target to test the extension, but this time it is not necessary. You can try the extension with any previous target or with any other target in which you found an issue (remember that the extension will send these details to a third party; so if you want to try the extension during a PT you should be allowed to use third party LLM models). If you need a convenient target, the PortSwigger Web Security Academy has pretty much everything for any kind of application issue, such as SQL Injection labs.
Disclaimer: this extension by using Burp’s AI features consumes AI Credits. At the moment, every user with a Burp Suite Professional license has 10,000 free credits, and once they are finished, additional credits need to be purchased. The extension’s credit consumption is usually moderate, but it also depends on the size of the request/response being reported.
Disclaimer 2: as mentioned previously, the reported requests and responses, along with the data entered in the popup created by the extension, are sent to PortSwigger’s AI infrastructure. You can find more details on Burp AI policy in the Burp AI trust and compliance FAQ.
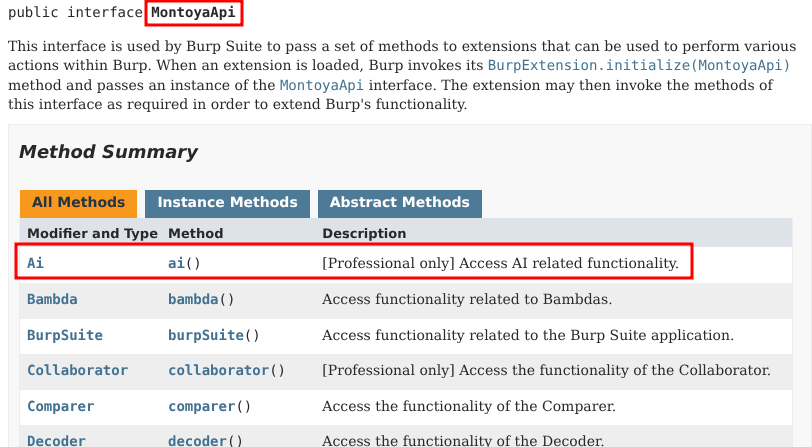
So, let’s start from the beginning. How can we use AI in our extension? We can get a reference to the Ai object that we need from the usual MontoyaApi object that we get when we initialize an extension:
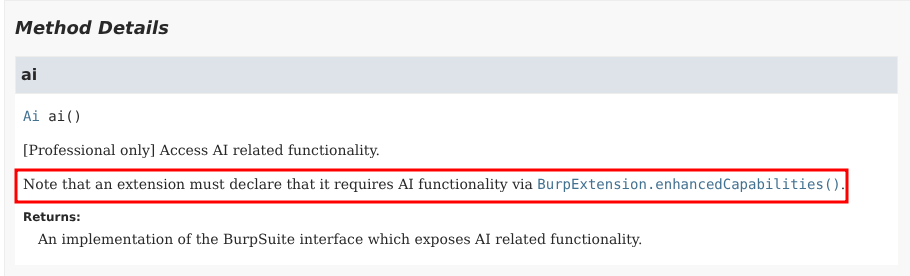
As the documentation said, we need to do an extra step: in order to allow our extension to use AI features it need to declare its usage in the initialization:
So, we can build the skeleton of a new extension, as explained in Part 1, adding what it necessary to get access to the AI features:
package org.fd;

import burp.api.montoya.BurpExtension;
import burp.api.montoya.EnhancedCapability;
import burp.api.montoya.MontoyaApi;
import burp.api.montoya.ai.Ai;
import burp.api.montoya.logging.Logging;

import java.util.Set;

import static burp.api.montoya.EnhancedCapability.AI_FEATURES;

public class AiReporter implements BurpExtension {

    MontoyaApi api;
    Ai ai;
    Logging logging;
    AiEngine aiEngine;
    boolean debug;

    @Override
    public void initialize(MontoyaApi api) {

        // Save a reference to the MontoyaApi object
        this.api = api;

        // Save a reference to the AI object
        this.ai = api.ai();

        // api.logging() returns an object that we can use to print messages to stdout and stderr
        this.logging = api.logging();

        // Set the name of the extension
        api.extension().setName("AI Reporter");

        // Print a message to the stdout
        this.logging.logToOutput("*** AI Reporter loaded ***");

        // Check if AI is enabled
        if(this.ai.isEnabled())
            this.logging.logToOutput("* AI enabled!");
        else
            this.logging.logToError("* AI NOT enabled!");

        // Other initialization things
        [...]

    }

    @Override
    public Set<EnhancedCapability> enhancedCapabilities()  {
        return Set.of(AI_FEATURES);
    }

}
As you can see, we declared the use of AI features by overriding the enhancedCapabilities function, returning a set containing the AI_FEATURES enum value.
Furthermore, at the end of the initialize function we used the isEnabled function to check if AI functionalities are currently enabled:
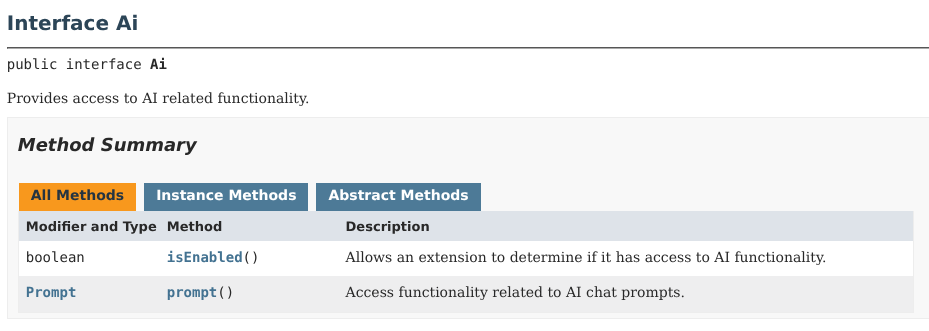
Let’s spend a couple of word on when this method returns true, necessary for being able to use the prompt method of the same class to use the AI features with our prompts.
First, as we just said, we have to override the enhancedCapabilities (✅ done).
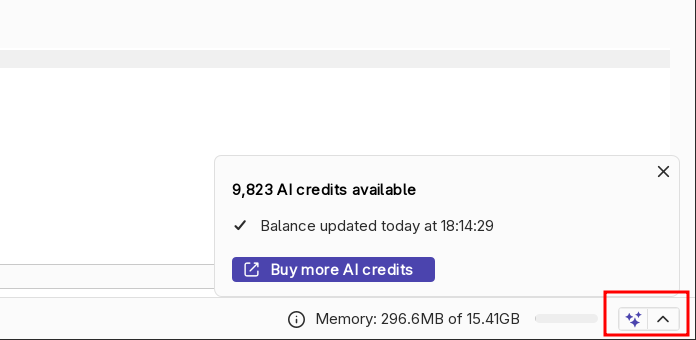
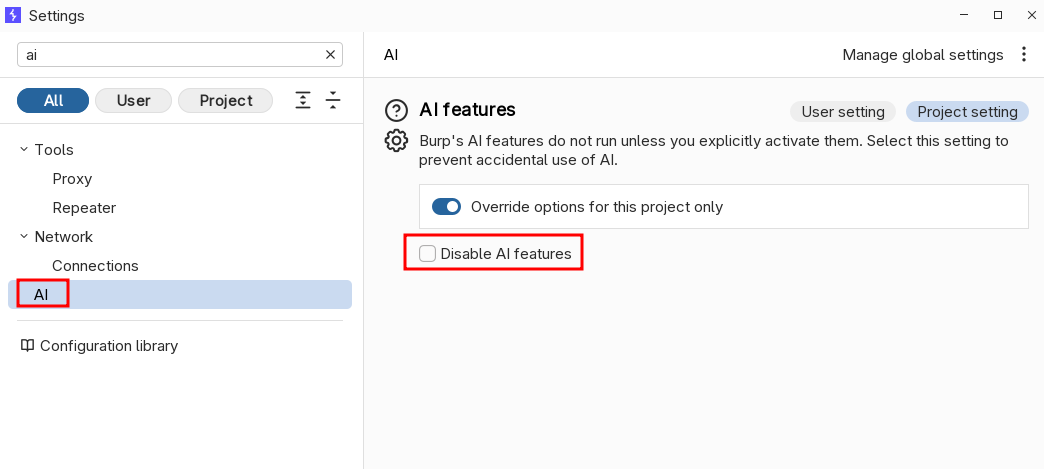
Second, AI features should be globally enabled in Burp Suite. You can check this point in the bottom right corner of Burp Suite:
If that corner shows the “Disabled” message, AI features can be enabled in the Settings of Burp Suite, section Ai:
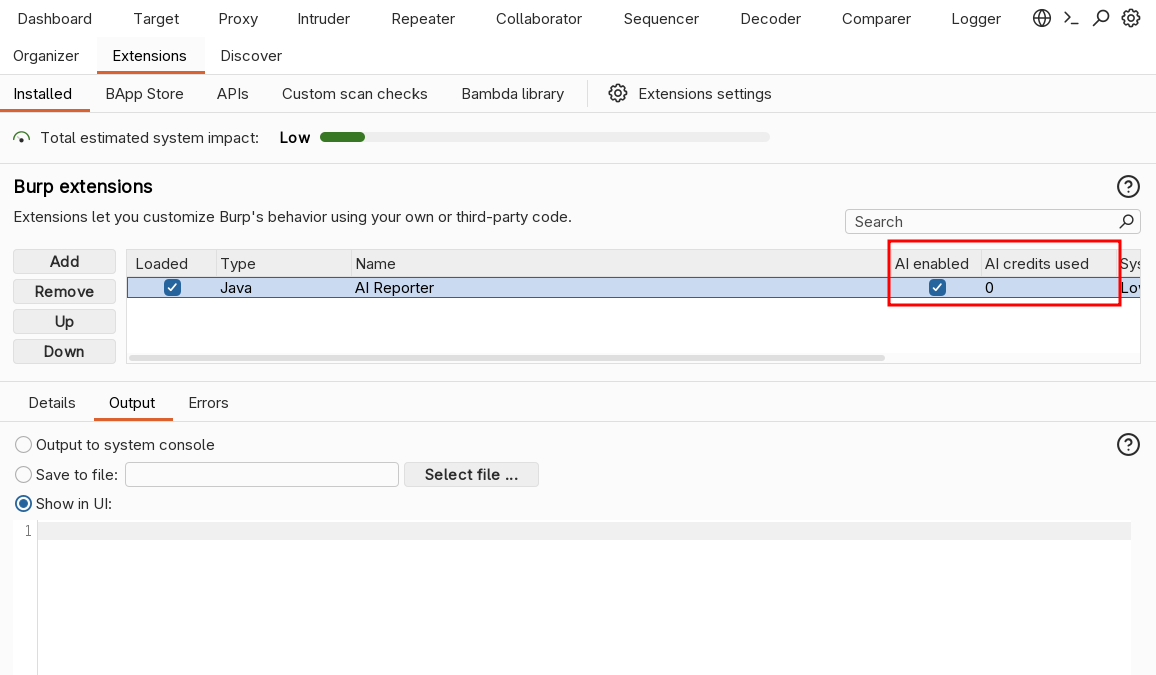
Third and last point, we have to enabled AI functions in the Extensions tab. Here, some additional columns have been added to handle AI extensions, including a flag to enable/disable AI features and the current AI credits consumption for each extension:
If all these three conditions are met, we will read “* AI enabled!” in the Output pane of our extension.
Now, let’s have a look of the main class of the extension, named AiEngine. This class will define the object that we will use to use the AI in our extension, containing a simple prompt (that can be engineered on our preferences and needs) and the code that will use it.
package org.fd;

import burp.api.montoya.ai.Ai;
import burp.api.montoya.ai.chat.Message;
import burp.api.montoya.ai.chat.PromptException;
import burp.api.montoya.ai.chat.PromptResponse;

import static burp.api.montoya.ai.chat.Message.*;

public class AiEngine {

    public static final String SYSTEM_MESSAGE = """
            You are an expert penetration tester and application security analyst. Your task is to analyze an HTTP request/response pair in which a specific vulnerability has been identified.

            You will receive:
            - The vulnerability name (issue type)
            - The HTTP request
            - The HTTP response
            - Optionally, additional details provided by the analyst

            Your objectives:
            1. **Analyze** the request and response to locate concrete evidence of the reported vulnerability.
            2. **Generate a title** that is specific and descriptive for this particular instance of the vulnerability (do not just repeat the generic vulnerability name — include context such as the affected parameter, endpoint, or functionality).
            3. **Generate a detailed description** of the finding that includes:
               - What the vulnerability is and why it is a security concern
               - Where exactly in the request/response the vulnerability manifests (cite specific parameters, headers, response content, or behavior)
               - The potential impact if exploited by an attacker
            4. **Generate remediation advice** that is specific and actionable for this particular case, not just generic best practices.

            Rules:
            - Be precise: reference actual values, parameters, endpoints, and response content from the provided data.
            - If additional details are provided by the analyst, incorporate them into your analysis.
            - If you cannot find clear evidence of the vulnerability in the request/response, state this explicitly in the details field.
            - Write in a professional tone suitable for a penetration testing report.
            - Respond ONLY with a valid JSON object, no additional text before or after it.

            Output format (strict JSON):
            {
              "title": "Specific descriptive title of the finding",
              "details": "Detailed description including evidence, location, and impact",
              "remediation": "Specific and actionable remediation steps"
            }
            """;

    private final Message systemMessage;
    Ai ai;

    public AiEngine(Ai ai) {
        this.systemMessage = systemMessage(SYSTEM_MESSAGE);
        this.ai = ai;
    }

    // Function that call LLM using history (may throw a PromptException exception)
    public String execute(String userPrompt) throws PromptException {

        if(this.ai.isEnabled()) {

            // Create the message array that includes the system prompt and the user message
            Message[] messages = new Message[]{systemMessage, userMessage(userPrompt)};

            // We execute the LLM call
            PromptResponse response = this.ai.prompt().execute(messages);

            // We return the assistant response
            return response.content();

        } else {

            return null;

        }

    }

    public boolean isAiEnabled() {
        return this.ai.isEnabled();
    }

}
This class is very simple. We have a system prompt that instruct the LLM on the particular task and on the structure we expect for the output, a constructor the store the Ai object of the Montoya API, and a function, execute, that contains the main logic.
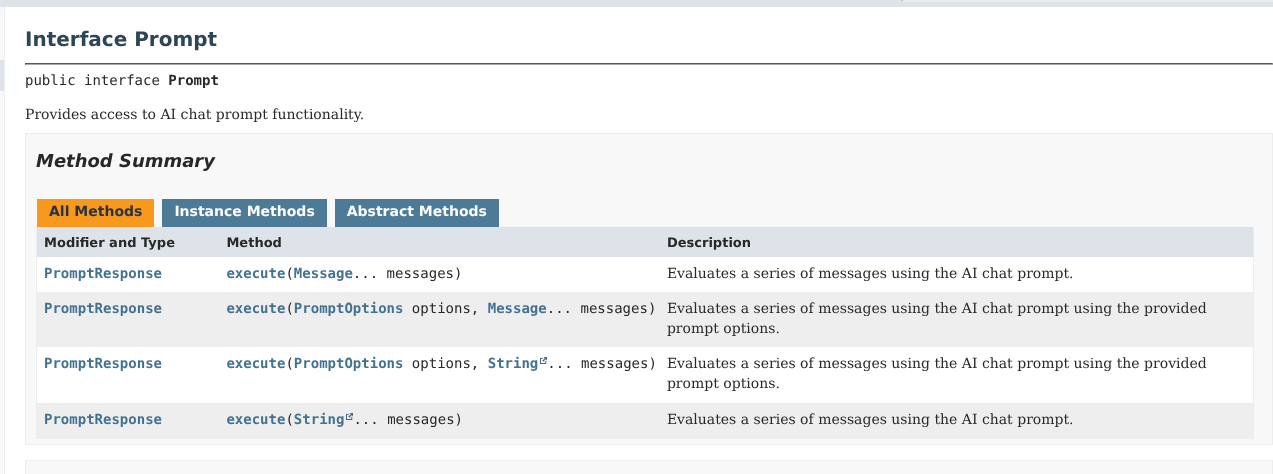
The execute function first checks if the AI features are enabled and then calls the execute function of the Prompt object, obtained from the Montoya API Ai object:
The execute function takes as argument a series of messages (an array of Message object), and not a single message. Why? This is because the APIs are structured in a way that allows us to separate the system prompt from the user messages and the assistant’s responses. In the end, everything will be sent to the LLM itself all together (because the LLMs work that way), but the AI services offered by PortSwigger will likely provide a structured separation of these messages, allowing the LLM to better understand who the different messages are coming from. The different message types we can use are the following ones:

In a simple flow, like in our extension, we send the LLM two messages, a system message (with the prompt) plus a user message (with the user’s question), and we receive an assistant message (with the response) in return. However, we can use these APIs to create more complex extensions, such as a chat with history, in which at each interaction we send to the LLM multiple user and assistant messages, and all those interactions are used by the LLM to produce its responses. In our extension we don’t need to maintain history but it is an interesting use case and I will add a PoC example at the end of the article that shows how to use history in AI extensions.
Now let’s go back to our extension. We’ve looked at the object that will handle the AI part. Now we need to build the structure around it. We want to right-click on a request and directly create the issue, using AI to analyze the request/response and write the issue. Therefore, we need to use Burp Suite ContextMenuItemsProvider APIs. We will look quickly at this portion of the extension, as we dived deeply in these functionalities in part 5 of this tutorial. We will put the context menu login in a dedicated class, named AiReportedContextProvider.
package org.fd;

import [...]

public class AiReporterContextProvider implements ContextMenuItemsProvider {

    MontoyaApi api;
    Logging logging;
    JsonUtils jsonUtils;
    AiEngine aiEngine;
    boolean debug;

    public AiReporterContextProvider(MontoyaApi api, AiEngine aiEngine, boolean debug) {

        // Save a reference to the MontoyaApi object
        this.api = api;
        // Save a reference to the logging object of the MontoyaApi
        this.logging = api.logging();
        // Save a reference to JSON utilities
        this.jsonUtils = api.utilities().jsonUtils();
        // Save a reference to the object defined to handle AI
        this.aiEngine = aiEngine;
        // Debug variable
        this.debug = debug;

    }

    public void reportWithAi(String vulnerability, AuditIssueSeverity severity, AuditIssueConfidence confidence,
                             String additionalDetails, HttpRequestResponse reqRes) {
        [...]
    }

    @Override
    public List<Component> provideMenuItems(ContextMenuEvent event) {

        // Initialize an empty list that will contains our context menu entries
        List<Component> menuItems = new ArrayList<Component>();

        // Create the menu only if the menu has been created on a request/response object
        event.messageEditorRequestResponse().ifPresent(messageEditorReqRes -> {

            // Get the HTTP message
            HttpRequestResponse reqRes = messageEditorReqRes.requestResponse();

            // Add the "Report with AI" context menu item with its listener
            JMenuItem reportWithAiItem = new JMenuItem("Report with AI");
            reportWithAiItem.addActionListener(al -> {

                // Show only if AI features are enabled
                if(this.aiEngine.isAiEnabled()) {

                    AiReporterDialog dialog = AiReporterDialog.show(null);

                    // If the dialog is confirmed call the reportWithAi function that will call the LLM and report the issue
                    if (dialog.isConfirmed()) {
                        String vulnerability = dialog.getVulnerability();
                        AuditIssueSeverity severity = dialog.getSeverity();
                        AuditIssueConfidence confidence = dialog.getConfidence();
                        String additionalDetails = dialog.getAdditionalDetails();

                        // A new thread is necessary because we cannot call the LLM function inside the GUI thread
                        // to avoid blocking Burp
                        new Thread(() -> {
                            reportWithAi(vulnerability, severity, confidence, additionalDetails, reqRes);
                        }).start();

                    }

                } else {

                    JOptionPane.showMessageDialog(null, "Please enable Burp AI features to " +
                                    "use this extension (additional costs may be charged)",
                            "Burp AI disabled", JOptionPane.INFORMATION_MESSAGE);
                }

            });

            menuItems.add(reportWithAiItem);

        });

        return menuItems;

    }

}
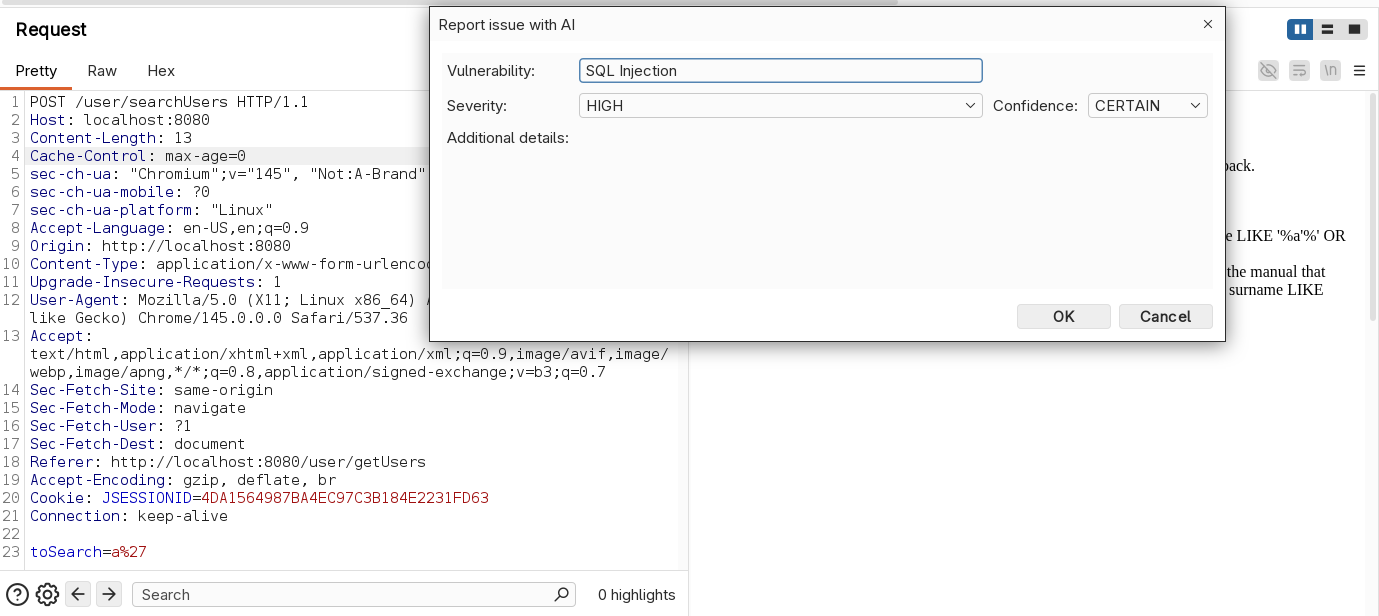
This code simply saves references to objects we will use in the constructor and then override the provideMenuItems function of the implemented ContextMenuItemsProvider interface. Here we add the “Report with AI” context menu entry only if the user clicked on a request/response and if the AI features are enabled. Once clicked, a new popup is shown to the user, designed in class AiReporterDialog with Java Swing, asking for a couple of information that will be used during generation. In this chapter, we won’t go into detail about how to create graphical user interfaces in Java (not a fun task at all, trust me!). We might cover an introduction in future episodes. If you need to create a Java GUI before then, Claude/Gemini/ChatGPT & co. will definitely be able to help you! The popup, once opened, will look this way:

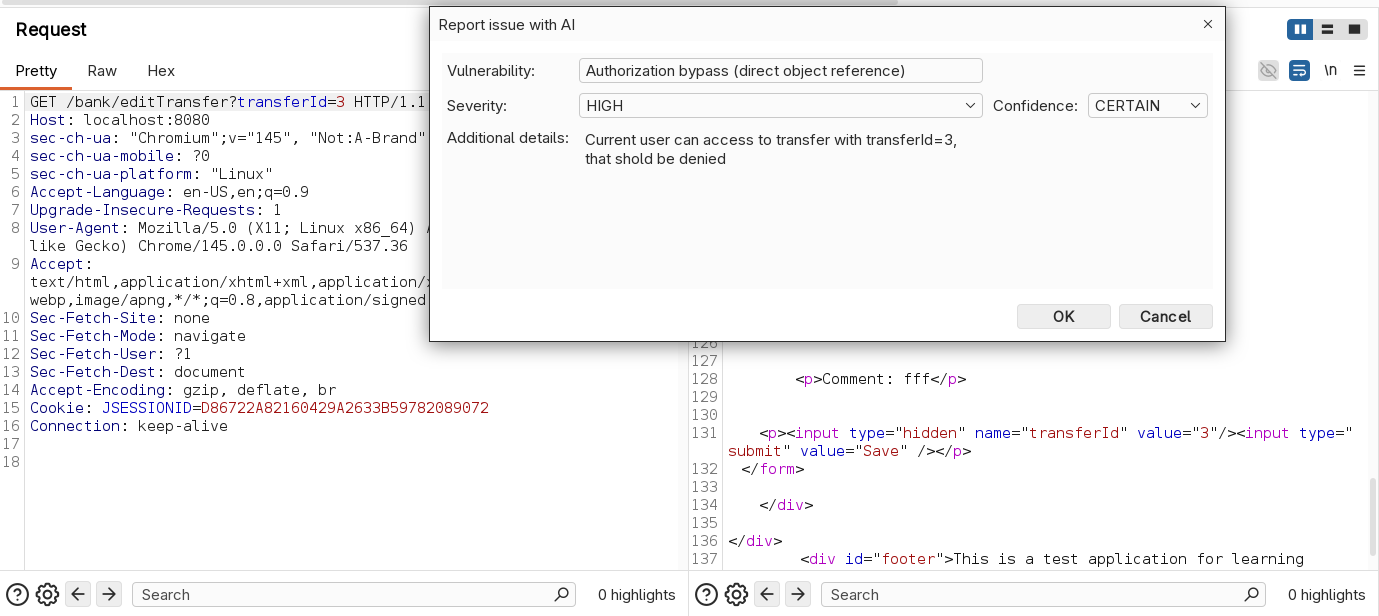
“Severity” and “confidence” will be used only to create the issue, while “vulnerability” and “additional details” will be supplied to the LLM, together with the request/response for the generation. The idea is the following: in most cases, it’s enough to enter the title of the issue (e.g., SQL Injection), and the LLM will take care of identifying the issue in the request/response, extracting the important information, and generating the issue report.
“Additional details” is occasionally used for issues where there is no direct evidence of the problem in the single request/response. For example, in the case of an authorization bypass, the user can specify that the current user he is using does not have access to the resource he was able to access in the request/response selected for the report (information that is not contained in the response itself). We will see a couple of examples of the extension in use in a moment.
Now, let’s have a look to the function reportWithAi, that will call the Ai engine and report the issue:
// Burp AI often returns markdown code block tags in the response also if denied in the prompt.
// This method strip markdown code block tags in the response using Lambda expressions.
private String cleanJsonResponse(String response) {
    return response.lines()
            .filter(line -> !line.trim().startsWith("```"))
            .collect(Collectors.joining("\n"))
            .trim();
}

// Call the AI Engine and report the issue
public void reportWithAi(String vulnerability, AuditIssueSeverity severity, AuditIssueConfidence confidence, String additionalDetails, HttpRequestResponse reqRes) {

    // If AI features are enabled
    if(this.aiEngine.isAiEnabled()) {

        // User message format
        String userMessage = """
                Vulnerability name: %s

                HTTP Request:
                %s

                HTTP Response:
                %s

                Additional details: %s
                """.formatted(vulnerability, reqRes.request().toString(),
                    reqRes.response().toString(), additionalDetails);

        String title;
        String details;
        String remediation;

        try  {
            // Call the LLM with the user message
            String promptResponse = aiEngine.execute(userMessage);

            if(promptResponse != null) {

                // Remove markdown code block tags in LLM response
                String cleanedResponse = cleanJsonResponse(promptResponse);

                // LLM response is formatted in JSON, as requested in our prompt
                if (this.jsonUtils.isValidJson(cleanedResponse)) {

                    // Extract from JSON the details of the issue generated by the LLM
                    title = this.jsonUtils.readString(cleanedResponse, "title");
                    details = this.jsonUtils.readString(cleanedResponse, "details");
                    remediation = this.jsonUtils.readString(cleanedResponse, "remediation");

                } else {
                    this.logging.logToError("* AI Reporter: invalid JSON in AI response");
                    return;
                }

            } else {
                this.logging.logToError("* AI Reporter: AI not enabled");
                return;
            }

        } catch (PromptException e)  {
            this.logging.logToError("Issue executing prompt", e);
            return;
        }

        // Report issue in Burp Suite with AI details
        AuditIssue auditIssue = AuditIssue.auditIssue(title,
                details,
                remediation,
                reqRes.request().url(),
                severity,
                confidence,
                null, // background
                null, // remediationBackground
                severity,
                reqRes);

        this.api.siteMap().add(auditIssue);

    } else {
        this.logging.logToError("* AI Reporter: AI features disabled.");
    }

}
The reportWithAi method takes as arguments all the information entered by the user in the popup plus the request/response pair. This information is included in the user message, which will then be sent to the LLM together with the system prompt.
As we saw earlier, the prompt asks the LLM to generate the response in JSON format, so we will use the JSON utilities provided by the Montoya API (api.utilities().jsonUtils()) to extract the title, details, and remediation from the response received from the LLM. However, you can see from the code that before extracting the JSON values the clearJsonResponse method is executed on the response obtained from the LLM. The reason is that the LLM often (though not always) returned the JSON wrapped inside Markdown code blocks (“`), even when explicitly forbidden in the prompt. With LLMs, situations like this can happen and can often be resolved by tuning the prompt. In this case, even after some prompt tuning, I would occasionally still get Markdown tags, so I preferred to strip them out in code.
Finally, we use the information extracted from the LLM response to create an issue in Burp Suite (for more information on this topic, refer to Part 6).
Our extension is now complete. We have only to register the context menu item provider in the initialize function:
public class AiReporter implements BurpExtension {

    [...]

    @Override
    public void initialize(MontoyaApi api) {

        [...]

        // Register our Context Menu Item Provider
        AiReporterContextProvider customContextMenuItemProvider = new AiReporterContextProvider(api,this.aiEngine, this.debug);
        api.userInterface().registerContextMenuItemsProvider(customContextMenuItemProvider);

    }

}
Now we can build the extension and try it on a couple of vulnerable requests (refer to Part 1 to details on how to compile and package the extension).
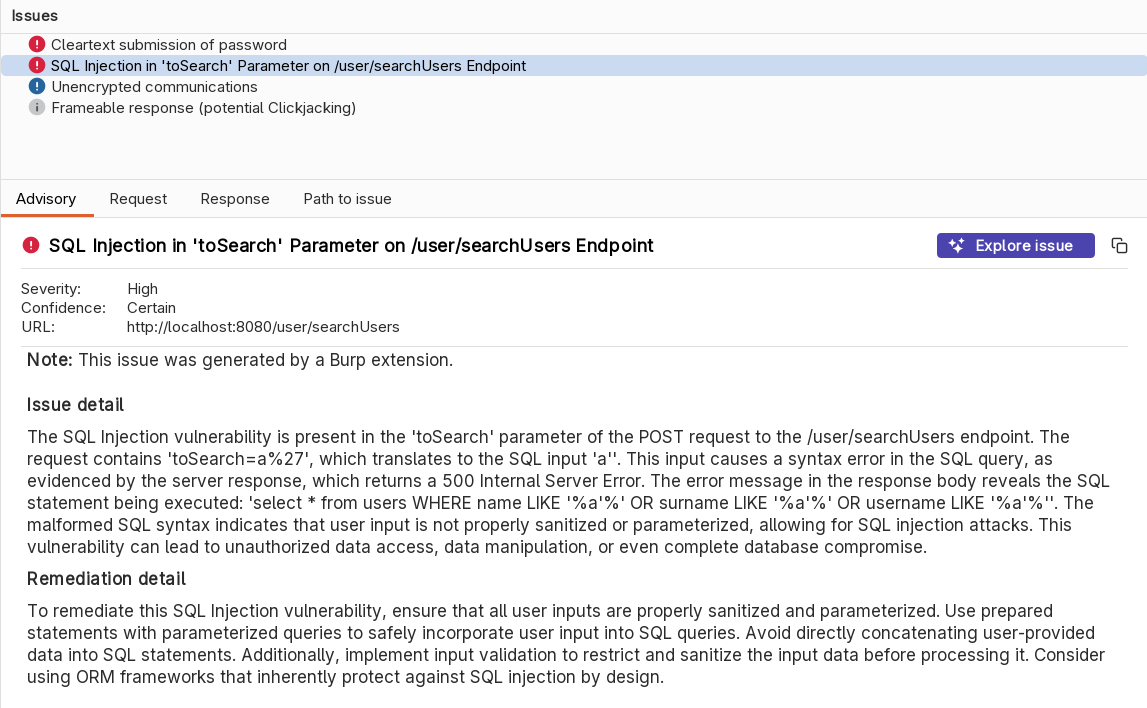
Let’s start with a simple SQL Injection.
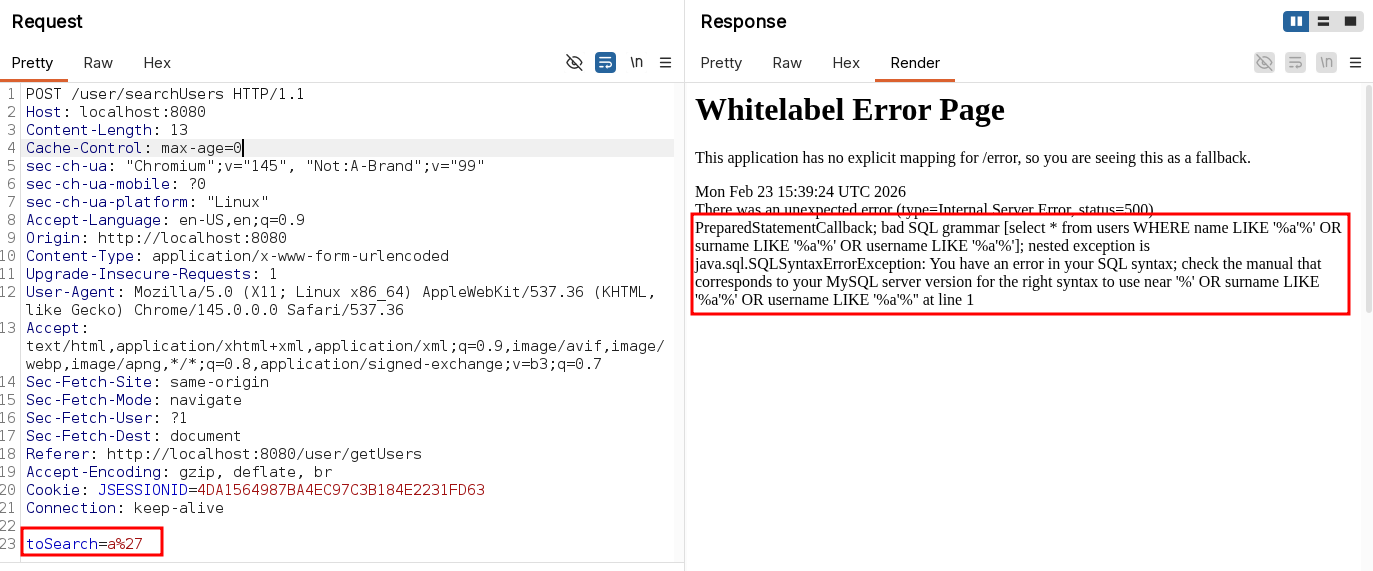
Let’s try our extension supplying only the title:
And here the result:
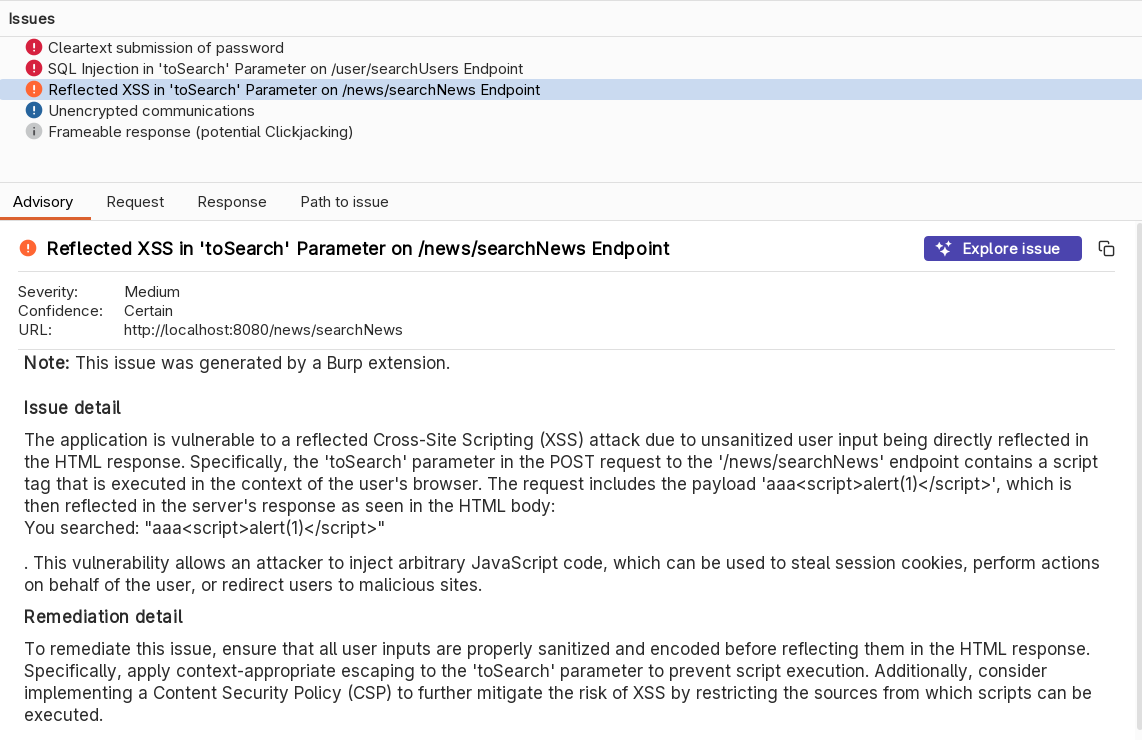
Now, let’s try with a simple reflected XSS:
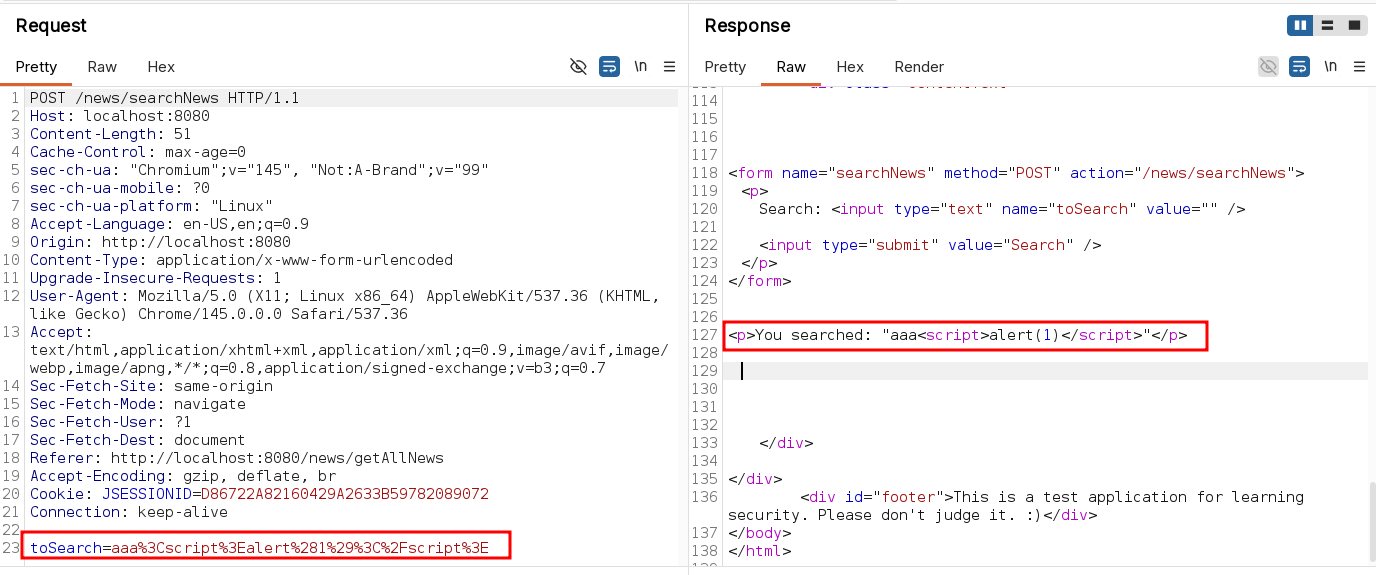
As before, we simply supply a generic title to the issue:

And here the result:
Finally, let’s try our extension on an authorization bypass (direct object reference). In this example we can see details of transfer with ID 3 with a user that should not have access to it:

We supply this additional information to the LLM because it cannot infer it simply by the request/response.
And here the result:
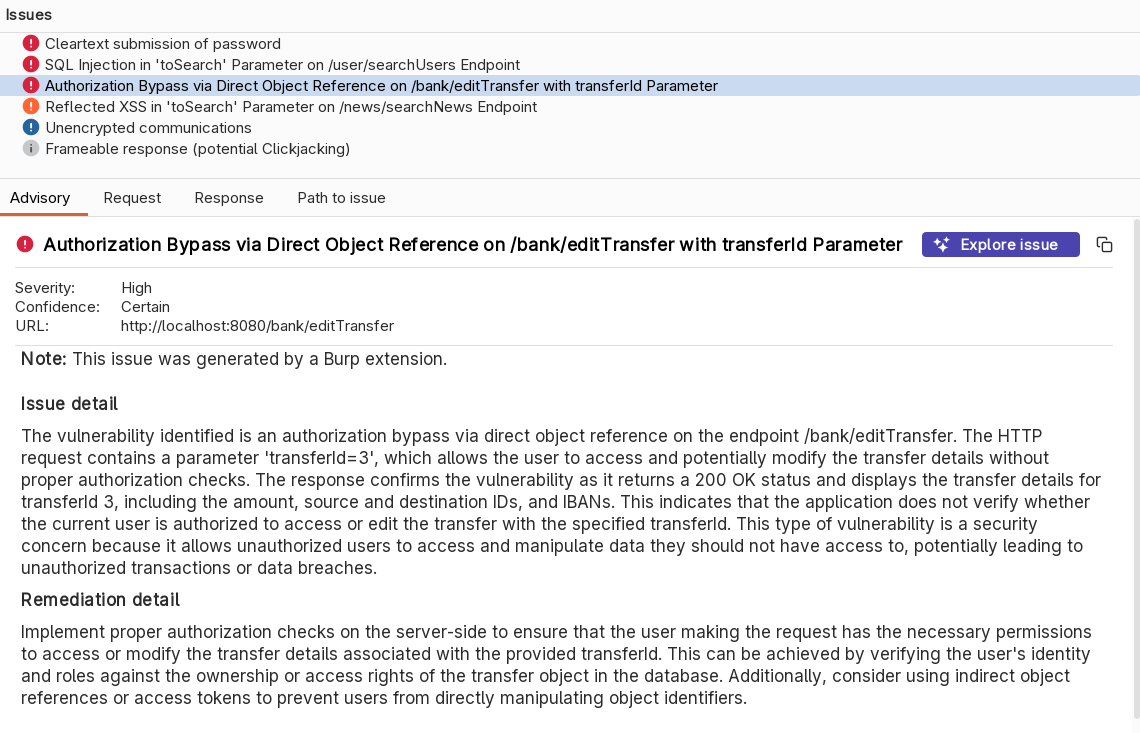
As we can see, with a simple prompt we got some pretty good results. Obviously, we can improve the results in order to fit better the results with our needs. Some examples of improvements we can implement on our prompt are:
- Tuning the instructions
- Examples of desired results (one shot / few shots)
- Maybe use dedicated prompts for the issue sections (details, title, remediation, etc.)
- Enforce positive and negative bonds
- Use delimiters to divide sections of the prompt
- Repeat most important instructions more times (yes, sometimes it works…)
- etc…
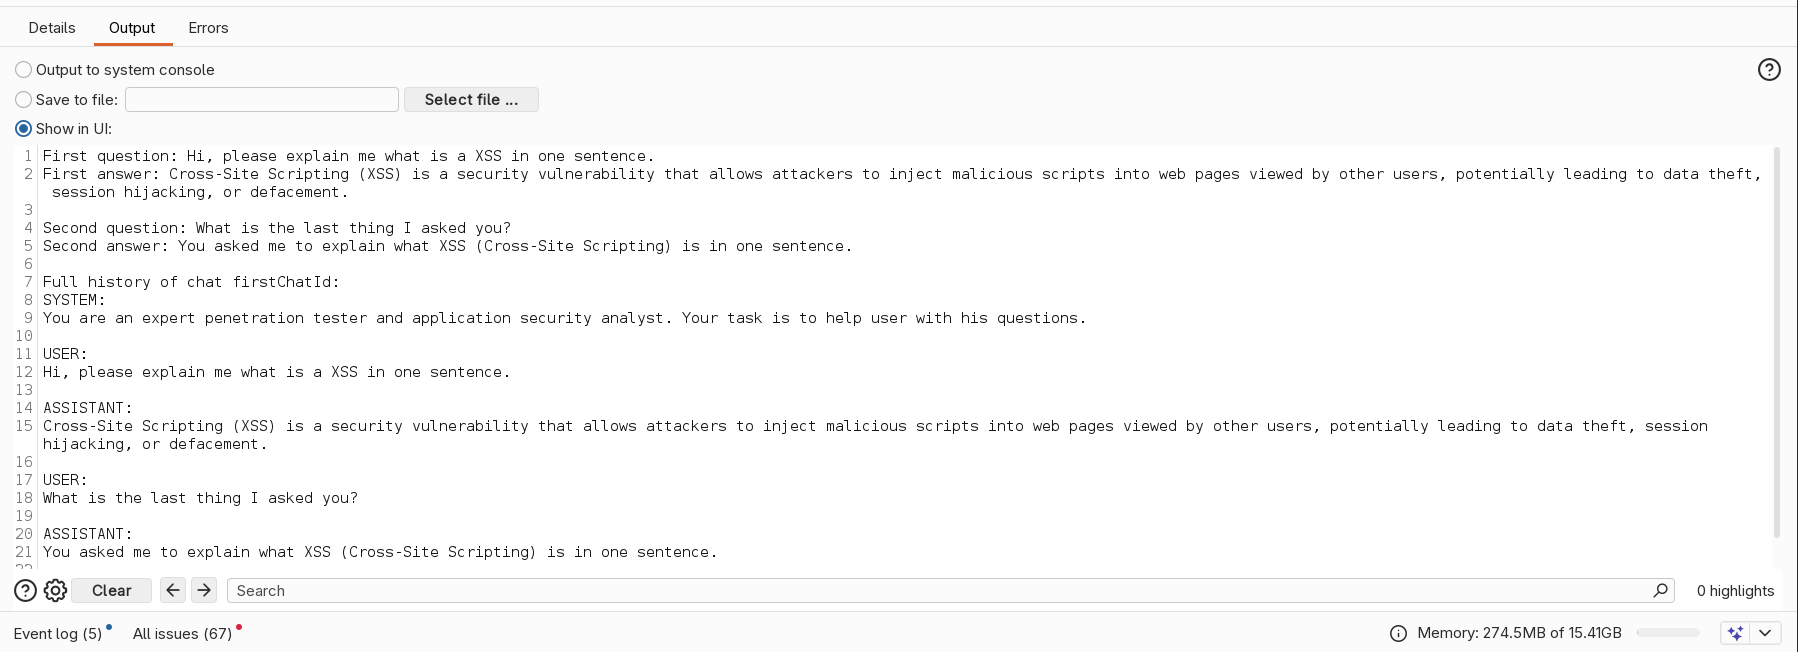
Before ending this article, let’s have a look to a simple PoC of a chat with history implemented in Burp Suite (it’s only a PoC of the chat engine, without the GUI code 😉 ), in a dedicated class named AiEngineWithHistory not used in our extension. In order to achieve this result, we will use the array of messages to store all the previous questions and answers, beside the current one and the system prompt.
The system message will be added first and will contain the system prompt. Then we will have sequences of user messages with questions and assistant messages with responses. By supplying the whole history to the LLM, it will consider all the message to produce the response because all the messages will be in its context. In scenarios like an interactive chat, this is very valuable. Let’s have a look at a practical example (NOT related to the AI Reported extension but useful to understand the AI APIs of Burp Suite):
package org.fd;

import burp.api.montoya.ai.Ai;
import burp.api.montoya.ai.chat.Message;
import burp.api.montoya.ai.chat.PromptException;
import burp.api.montoya.ai.chat.PromptResponse;

import java.util.ArrayList;
import java.util.HashMap;
import java.util.List;
import java.util.Map;
import java.util.stream.Collectors;

import static burp.api.montoya.ai.chat.Message.systemMessage;
import static burp.api.montoya.ai.chat.Message.assistantMessage;
import static burp.api.montoya.ai.chat.Message.userMessage;

public class AiEngineWithHistory {

    public static final String SYSTEM_MESSAGE = "You are an expert penetration tester and application security analyst. Your task is to help user with his questions.";

    private final Message systemMessage;
    Map<String, List<Message>> history;
    Ai ai;

    public AiEngineWithHistory(Ai ai) {
        // Create a SYSTEM message object
        this.systemMessage = systemMessage(SYSTEM_MESSAGE);
        // Instantiate a Map to hold the history
        this.history = new HashMap<String,List<Message>>();
        // Save a reference to the AI object
        this.ai = ai;
    }

    // Function that call LLM using history
    public String execute(String chatId, String userPrompt) throws PromptException {

        if(this.ai.isEnabled()) {

            // If our history does not contain an entry for the supplied chat ID (case: new chat)
            // we create a new entry in our history with the SYSTEM message as first message
            if (!(this.history.containsKey(chatId))) {
                List<Message> newList = new ArrayList<Message>();
                newList.add(this.systemMessage);
                this.history.put(chatId, newList);
            }

            // We get a reference to the history of the current chat ID
            List<Message> currentList = this.history.get(chatId);

            //We add the new user message to the list
            currentList.add(userMessage(userPrompt));

            // We send the full message list to the AI, in order to receive a response
            // that consider the whole message history
            PromptResponse response = this.ai.prompt().execute(currentList.toArray(Message[]::new));

            // We save the LLM response as an assistant message in the history
            currentList.add(assistantMessage(response.content()));

            // TODO: Trim?

            // We return the assistant response
            return response.content();

        } else {

            return null;

        }

    }

    // Function that convert the history of a chat to a string using Lambda expressions
    public String toString(String chatId) {

        if(this.history.containsKey(chatId)) {

            return this.history.get(chatId).stream()
                    .map(Message::toString)
                    .collect(Collectors.joining("\n"));

        } else {
            return null;
        }

    }

    public boolean isAiEnabled() {
        return this.ai.isEnabled();
    }

}
The code is quite well commented, but substantially we use a Map object to store our history. The key of the map is a chat identifier (because this way we can handle more chats) and the value is a list of messages. When the user call the execute method supplying a message and a chat identifier, we check in our Map if we already have a reference to that particular chat. If not, we create a new entry in the map with a list containing the system prompt. Then, we add the user message to the chat, we call the LLM and we store the assistant response in the same list, before returning the assistant message to the user. With this approach, we keep a full history of all the messages in the chat sessions and when a new user message is executed with an existing chat identifier, all the previous messages are sent to the LLM with the new one, giving to the LLM more context. Let’s try our class to try if it is working correctly (the code has been added to the initialize function just for this try):
AiEngineWithHistory aiHistory = new AiEngineWithHistory(this.ai);

new Thread(() -> {

    String chatId = "firstChatId";

    String firstQuestion = "Hi, please explain me what is a XSS in one sentence.";
    String firstAnswer = aiHistory.execute(chatId, firstQuestion);
    this.logging.logToOutput("First question: " + firstQuestion);
    this.logging.logToOutput("First answer: " + firstAnswer);
    this.logging.logToOutput("");

    String secondQuestion = "What is the last thing I asked you?";
    String secondAnswer = aiHistory.execute(chatId, secondQuestion);
    this.logging.logToOutput("Second question: " + secondQuestion);
    this.logging.logToOutput("Second answer: " + secondAnswer);
    this.logging.logToOutput("");

    this.logging.logToOutput("Full history of chat " + chatId + ":");
    this.logging.logToOutput(aiHistory.toString(chatId));

}).start();
By running this code we can see that the second question ask details on the first one, receiving the correct answer, and the history includes all the messages of the chat:
I will leave class AiEngineWithHistory in the source code of the extension, along with the class to try it commented in the initialize function.
Keep in mind that if you build a chat, there are additional complexities to address. As the number and size of messages in the history increase, not only do token usage and costs go up, but you may also run out of available context space or cause a “dilution” of the system prompt instructions (or even a complete loss of its instructions). These are more advanced concepts in developing LLM-based tools that we can’t approaching now, but they definitely need to be taken into consideration.
As always, the complete code can be downloaded from my GitHub repository.
If you liked the extension we developed, I’m about to submit / I’m submitting / I’ll be submitting (depending on when I publish the article and manage to finish the extension 😄) a more complete version of it to the BApp Store, with a few additional features.
Official documentation and examples can be found at the following links:
Last but not least, as I mentioned at the beginning of this article, May will be dedicated to extensibility on the PortSwigger Discord, with events and resources focused on extensibility in Burp Suite. I will also be hosting an event on this topic titled “Restoring Testability: Handling Complex Scenarios in Burp Suite with a Custom Extension” on May 14. If you are interested in the topic you can join the PortSwigger Discord server here and you can find my event here.
I hope you enjoyed this chapter. See you soon!